


.jpg)
* * *
 On this page, I will indulge in selfless self promotion of my talents in the making of stringed musical instruments. My primary interest is in the design and construction of the electric bass guitar. However, once involved in this endeavor, it is hard not to dabble in acoustic basses, guitars and even violins.
My interest in Luthery began around 1970, although the love of music seems to have been with me from birth. My love affair with the bass guitar began to grow with leaps and bounds during those musically creative years encompassing the mid-60's to the mid-70's. Garage bands of every calibre began to spring up in virtually every neighbourhood, trying desperately to imitate their heroes, The Cream, Deep Purple, Jimi Hendrix, Mountain, The Who, Led Zeppelin and the like. It was a magical time...
The bass guitar was always the first instrument to betray the location of a band practice or "Jam", as you could always feel the notes long before they were ever heard. I was fascinated with this bottom end power, and my love affair with the bass had begun.
Not having the funds to purchase an instrument, I decided in some moment of creative insanity to make my own. Ignorance of the facts and lack of skills were to be no obstacle as teenage exuberance would make anything possible!
My father had at one time salvaged an old oak church pew which I cut out to mimic the style of a Fender Precision Bass, one of the most popular of the relatively few choices at the time. Poverty creates incentive for inspiration and improvisation, so, household items became incorporated into my first creation. Arborite made a functional pickguard while buttons served duty as fret markers.
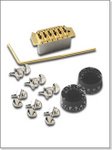
One has to realize that instrument making in the late sixties and early seventies bore no resemblance to the musical instrument market of today. Independent manufactures of after-market replacement parts did not exist and that Luthery outside of the factories consisted of steel string and classical guitar craftsmen in limited numbers. If one wanted quality parts, you had to approach a major manufacturer and they often were not interested in selling hardware to amateurs, except when attached to their entire instrument.
I remember one particular incident when I approached a sales clerk at a Hamilton, Ontario, music store about the possibility of buying frets for my bass. He strongly suggested I not take this repair on myself but to bring in my instrument and have it sent out for professional work. My telling him that this was not a repair but rather that I was building a bass from scratch got nothing more than head shakes and chuckles. This wasn't a do it yourself job for a sixteen year old!! I retrieved the nearly finished bass from my friend's parked van and showed the salesman...I got my frets!
Had I met this salesman prior to starting, I may never have attempted the project, but I never knew it was an "impossible" task, so I just went ahead and did it. Inadvertently, I had learned an important lesson in life.
In the end, I found myself the owner of a natural finish, P-bass clone with original Fender hardware and electronics. Oak, although not considered to be a traditional instrument wood, did give that bass a unique look and tremendous sustain. The blond maple neck with black fret markers really set it off. It was a beautiful beast, albeit a heavy one. All I needed now was a guitar strap and guitar case...Yup, I made those, too!
University life and apartment living following graduation prevented my setting up a shop and further delayed my desire to squeeze musical notes from a tree. I did not pursue the passion again until about 1989. With my wife's support, I had been slowly building up the materials, tools and knowledge to build bass guitars once again.
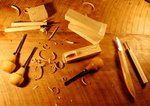
The basement, which was to have been our second family room, now became "The Workshop". It was here that I designed and built the first ThunderHouse Instruments bass guitar.
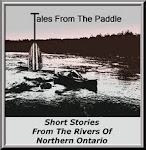
I registered the company with the Province of Ontario as a business. I chose the name "ThunderHouse" for my love of canoeing. ThunderHouse Falls is located on the Missinaibi River in Northern Ontario. When standing on its granite foundation in the Canadian Shield, the roar of crashing water seems to be not only an audible sensation, but a physical one. The vibrations feel as if they are transmitted up through the body and can be heard from within.
Local natives years ago felt that these were the spirits of their departed relatives speaking to them from beyond. Those sensations reminded me of those inaudible bass notes emanating from some unseen practice session. I chose to accompany "ThunderHouse" with "Instruments" as I detest limitations and "Instruments" would encompass any project of mine, be it violins or dulcimers.
 Having always been a do-it-yourself-er, I have recently been etching and assembling Printed Circuit Boards for on board preamplifier electronics and am about to resume experimenting with winding my own pickups, in which I had dabbled years ago.
With some regret, life has conspired to keep me from taking ThunderHouse Instruments to the next level. And so it remains a hobby much more than a thriving business. However, the smell of freshly cut wood still conjures up hope of what might someday be.
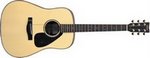
ThunderHouse Instruments currently produces a small number of hand crafted instruments per year. Several models in four- and five-string versions are available.
Instruments are made using the finest exotic woods, with three- to five-piece laminated, carbon fiber rod reinforced necks and a variety of fingerboard woods, including the traditional rosewood or ebony.
A variety of pickups and electronics will be offered. Finishes vary from the traditional nitrocellulose lacquer to the increasingly popular, environmentally friendly, water based finishes such as Hydrocote or Crystalac.
*********************************
Read More!


